- TypeScript 和 JSX
- 生命周期钩子
- 快照测试
- UI 与 DOM 测试
- 使用
--watch的监视模式 - 使用
--preload的脚本预加载
Bun 旨在兼容 Jest,但并非所有功能均已实现。要跟踪兼容性,请查看此跟踪问题。
运行测试
terminal
*.test.{js|jsx|ts|tsx}*_test.{js|jsx|ts|tsx}*.spec.{js|jsx|ts|tsx}*_spec.{js|jsx|ts|tsx}
bun test 传入额外的位置参数来筛选要运行的 测试文件。路径匹配任一筛选条件的测试文件都会被执行。通常,这些筛选条件是文件或目录名;目前尚不支持 glob 模式。
terminal
-t/--test-name-pattern 标志。
terminal
./ 或 / 开头,以区别于筛选名。
terminal
--preload 脚本(详见生命周期),然后运行全部测试。如果测试失败,运行器会以非零退出码退出。
CI/CD 集成
bun test 支持多种 CI/CD 集成方案。
GitHub Actions
bun test 会自动检测是否在 GitHub Actions 中运行,且会直接向控制台输出 GitHub Actions 注释。
无需额外配置,只需在工作流程中安装 bun 并运行 bun test。
如何在 GitHub Actions 工作流程中安装 bun
要在 GitHub Actions 工作流程中使用 bun test,添加如下步骤:
.github/workflows/test.yml
JUnit XML 报告(GitLab 等)
要结合 JUnit XML 报告器使用bun test,可以搭配 --reporter=junit 和 --reporter-outfile:
terminal
超时设置
使用--timeout 标志指定每个测试的超时时间(毫秒)。若测试超时,则判为失败。默认值为 5000。
terminal
并发测试执行
默认情况下,Bun 在每个测试文件内顺序执行所有测试。你可以启用并发执行,让异步测试并行运行,这能显著加速测试套件中的独立测试。--concurrent 标志
使用 --concurrent 标志,实现各测试文件内部的所有测试并发执行:
terminal
test.serial 标记。
--max-concurrency 标志
用 --max-concurrency 标志控制最大并发测试数量:
terminal
test.concurrent
单独标记测试为并发执行,即使未使用 --concurrent 也能并行运行:
test.serial
即使启用 --concurrent 标志,也强制测试顺序执行:
重试失败的测试
使用--retry 标志自动重试失败的测试,最多指定次数。如果测试失败后,在后续尝试中通过,则报告为通过。
terminal
{ retry: N } 设置覆盖全局的 --retry 值:
bunfig.toml 中设置:
bunfig.toml
重新运行测试
使用--rerun-each 标志让每个测试运行多次,有助于检测不稳定或非确定性的测试失败。
terminal
随机化测试执行顺序
使用--randomize 标志以随机顺序运行测试,有助于发现依赖共享状态或执行顺序的测试。
terminal
--randomize 时,随机种子会显示在测试摘要中:
terminal
使用 --seed 实现可复现的随机顺序
用 --seed 标志指定随机种子,以便调试顺序依赖失败时复现相同测试顺序。
terminal
--seed 标志隐含启用 --randomize,因此无需同时指定两者。使用相同种子值总是产生相同的测试执行顺序,使调试间歇性失败更为简单。
失败即停止 --bail
使用 --bail 标志,在达到指定失败次数后提前中止测试运行。默认情况下,Bun 会执行全部测试并报告所有失败,但在 CI 环境中,提前终止可减少 CPU 资源占用。
terminal
监视模式
类似于bun run,你可以传入 --watch 标志,让 bun test 监控文件变化并重新运行测试。
terminal
生命周期钩子
Bun 支持以下生命周期钩子:| 钩子 | 描述 |
|---|---|
beforeAll | 所有测试开始前执行一次 |
beforeEach | 每个测试开始前执行 |
afterEach | 每个测试结束后执行 |
afterAll | 所有测试完成后执行一次 |
--preload 预加载的单独文件中。
terminal
模拟
使用mock 函数创建模拟函数。
jest.fn(),其行为相同。
快照测试
bun test 支持快照测试。
--update-snapshots 标志。
terminal
UI 与 DOM 测试
Bun 兼容流行的 UI 测试库: 完整文档见测试 > DOM 测试。性能
Bun 的测试运行器非常快速。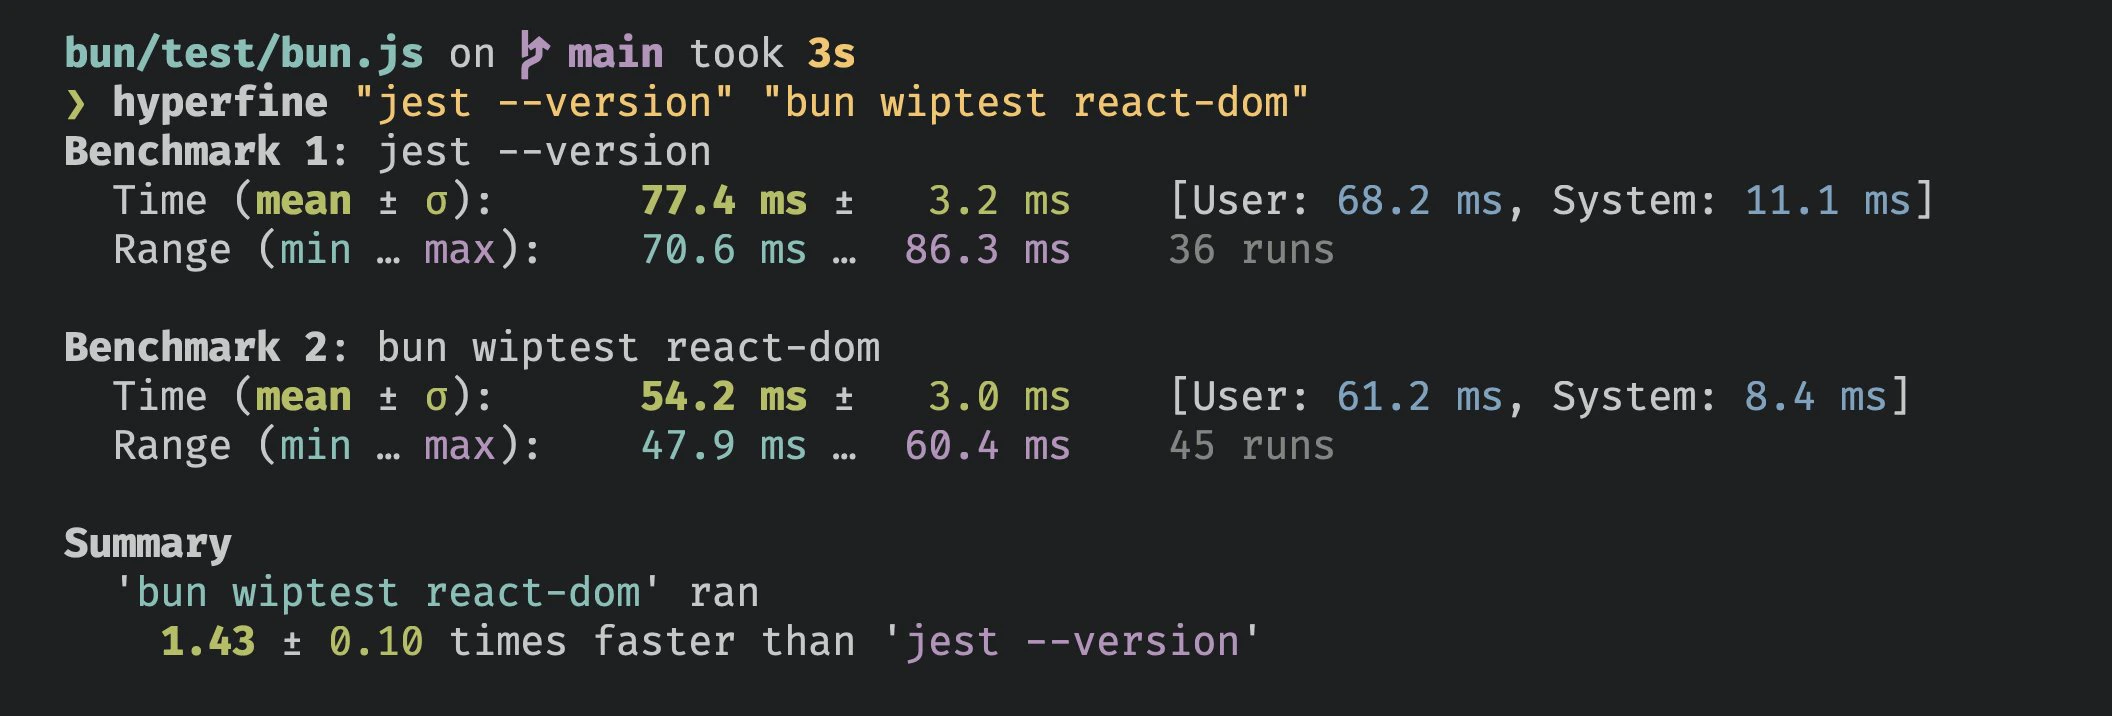
AI 代理集成
在使用 Bun 的测试运行器和 AI 编码助手时,你可以开启更安静的输出模式,以提高可读性,减少上下文噪音。此功能在保留重要失败信息的同时,最小化测试输出的详尽程度。环境变量
设置以下任一环境变量即可启用适合 AI 的输出:CLAUDECODE=1- 适用于 Claude CodeREPL_ID=1- 适用于 ReplitAGENT=1- 通用 AI 代理标志
行为
检测到 AI 代理环境时:- 只详细显示测试失败信息
- 隐藏通过、跳过及待办测试指示符
- 保留统计摘要
terminal
CLI 用法
执行控制
设置每个测试的超时时间,单位为毫秒(默认 5000)
每个测试文件重新运行
NUMBER 次,有助于捕捉某些错误所有测试的默认重试次数。失败的测试将最多重试
NUMBER 次。可被每个测试的 设置覆盖将所有测试视为
test.concurrent() 测试以随机顺序运行测试
设置测试随机化的随机种子
在出现
NUMBER 次失败后退出测试套件。如果不指定数字,默认为 1。最大同时执行的测试数量(默认 20)
测试过滤
包含标记为
test.todo() 的测试只运行名称匹配给定正则表达式的测试。别名:
-t报告
测试输出报告格式。可用选项:
junit(需要 —reporter-outfile)、dots。默认:控制台输出。报告格式的输出文件路径(与 —reporter 一起使用时必需)
启用点状报告。—reporter=dots 的简写
覆盖率
生成覆盖率报告
以
text 和/或 lcov 格式报告覆盖率。默认 text覆盖率文件的目录。默认
coverage快照
更新快照文件。别名:
-u示例
运行所有测试文件:terminal
terminal
terminal