> ## Documentation Index
> Fetch the complete documentation index at: https://bun.zhcndoc.com/llms.txt
> Use this file to discover all available pages before exploring further.
# 调试
> 使用 WebKit Inspector 协议,通过交互式调试器调试你的 Bun 代码
Bun 使用 [WebKit Inspector Protocol](https://github.com/oven-sh/bun/blob/main/packages/bun-inspector-protocol/src/protocol/jsc/index.d.ts),因此你可以使用交互式调试器来调试你的代码。为了演示效果,请考虑下面的示例 Web 服务器。
## 调试 JavaScript 和 TypeScript
```typescript icon="https://mintcdn.com/bun-zhcndoc/cnUTwgMuf4cCrwC-/icons/typescript.svg?fit=max&auto=format&n=cnUTwgMuf4cCrwC-&q=85&s=e7767043c9e885c34f2d6c8fe2a95217" title="server.ts" theme={"theme":{"light":"github-light","dark":"dracula"}}
Bun.serve({
fetch(req) {
console.log(req.url);
return new Response("Hello, world!");
},
});
```
### `--inspect`
运行 Bun 代码时使用 `--inspect` 标志,可以启用调试功能。该标志会自动启动一个 WebSocket 服务器,监听一个可用端口,用于检查正在运行的 Bun 进程。
```sh icon="terminal" title="terminal" theme={"theme":{"light":"github-light","dark":"dracula"}}
bun --inspect server.ts
```
```txt id="terminal" theme={"theme":{"light":"github-light","dark":"dracula"}}
------------------ Bun Inspector ------------------
Listening at:
ws://localhost:6499/0tqxs9exrgrm
Inspect in browser:
https://debug.bun.sh/#localhost:6499/0tqxs9exrgrm
------------------ Bun Inspector ------------------
```
### `--inspect-brk`
`--inspect-brk` 标志的行为与 `--inspect` 相同,不同的是它会在执行脚本的第一行自动插入一个断点。这对于调试运行很快并立即退出的脚本非常有用。
### `--inspect-wait`
`--inspect-wait` 标志的行为与 `--inspect` 相同,但代码会等待直到调试器附加到运行进程才开始执行。
### 为调试器设置端口或 URL
无论使用哪个标志,都可以选择性地指定端口号、URL 前缀或两者。
```sh icon="terminal" title="terminal" theme={"theme":{"light":"github-light","dark":"dracula"}}
bun --inspect=4000 server.ts
bun --inspect=localhost:4000 server.ts
bun --inspect=localhost:4000/prefix server.ts
```
***
## 调试器
各种调试工具可以连接到此服务器,提供交互式调试体验。
### `debug.bun.sh`
Bun 在 [debug.bun.sh](https://debug.bun.sh) 提供了一个基于 Web 的调试器。它是 WebKit 的 [Web Inspector Interface](https://webkit.org/web-inspector/web-inspector-interface/) 的修改版本,Safari 用户会觉得很熟悉。
打开提供的 `debug.bun.sh` URL 在浏览器中启动调试会话。在该界面,你可以查看正在运行文件的源代码,查看和设置断点,并使用内置控制台执行代码。
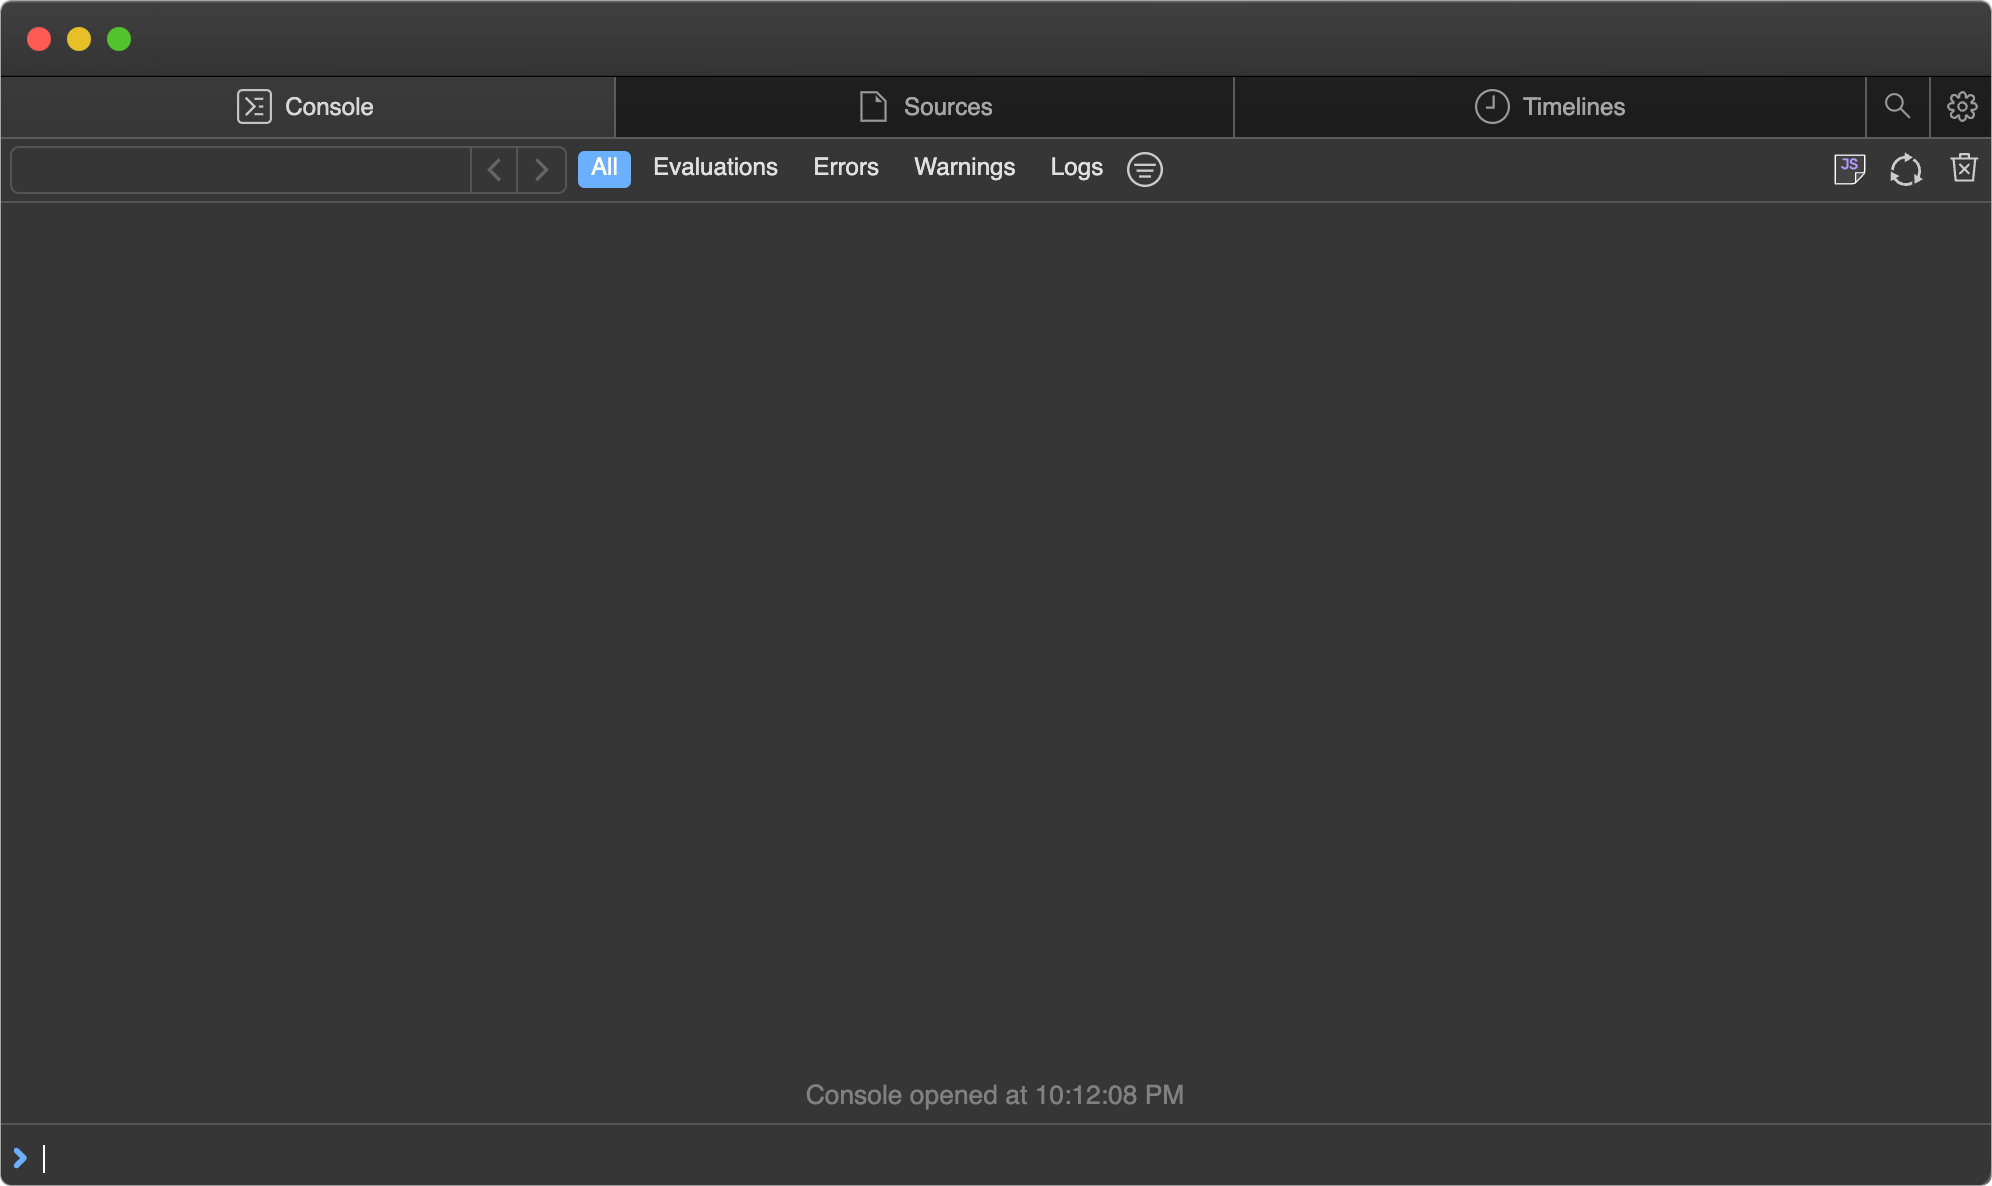
现在我们设置一个断点。切换到 Sources 标签;你应该能看到之前的代码。点击第 `3` 行的行号,在 `console.log(req.url)` 语句上设置断点。

然后在浏览器访问 [`http://localhost:3000`](http://localhost:3000) 。这会向我们的本地服务器发送 HTTP 请求。页面似乎无法加载,这是因为程序已在先前设置的断点处暂停执行。
注意界面发生的变化。
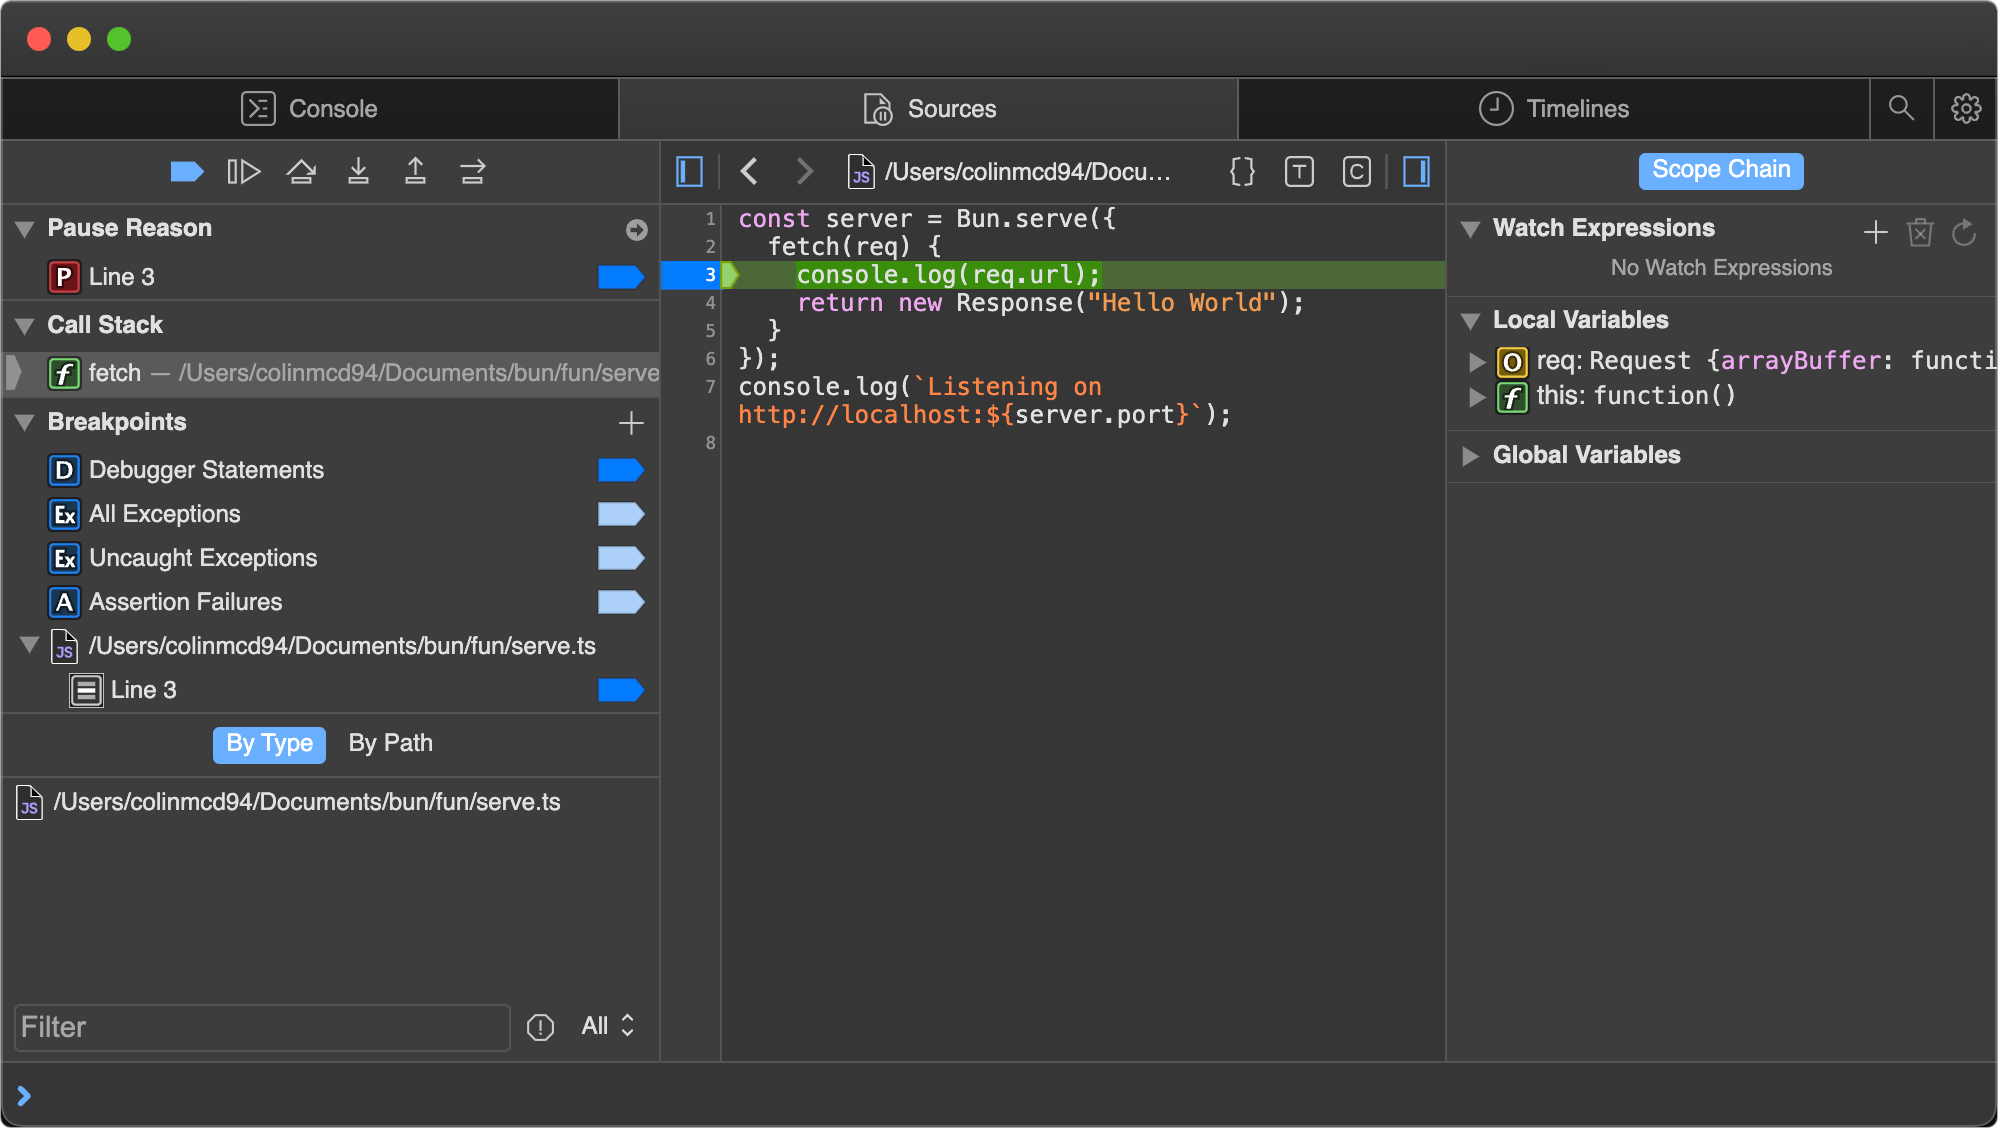
此时我们可以做很多事情来检查当前执行环境。我们可以使用底部的控制台,在程序上下文中运行任意代码,完全访问断点处范围内的变量。
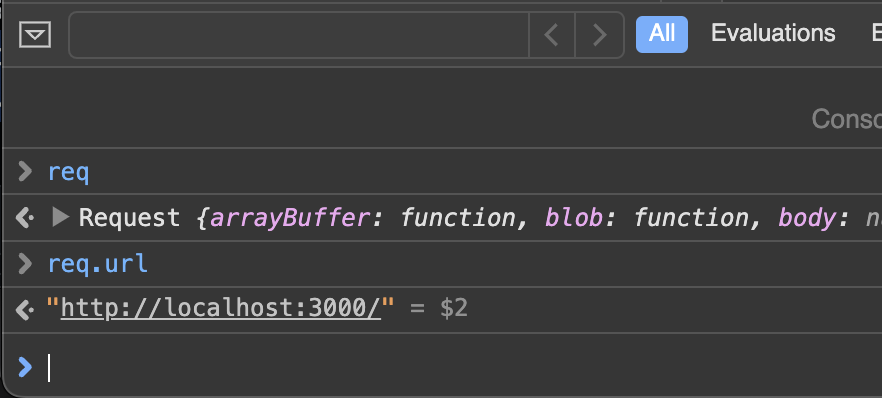
在 Sources 窗格的右侧,可以看到当前作用域中所有的局部变量,并可展开查看它们的属性和方法。这里我们检查了 `req` 变量。

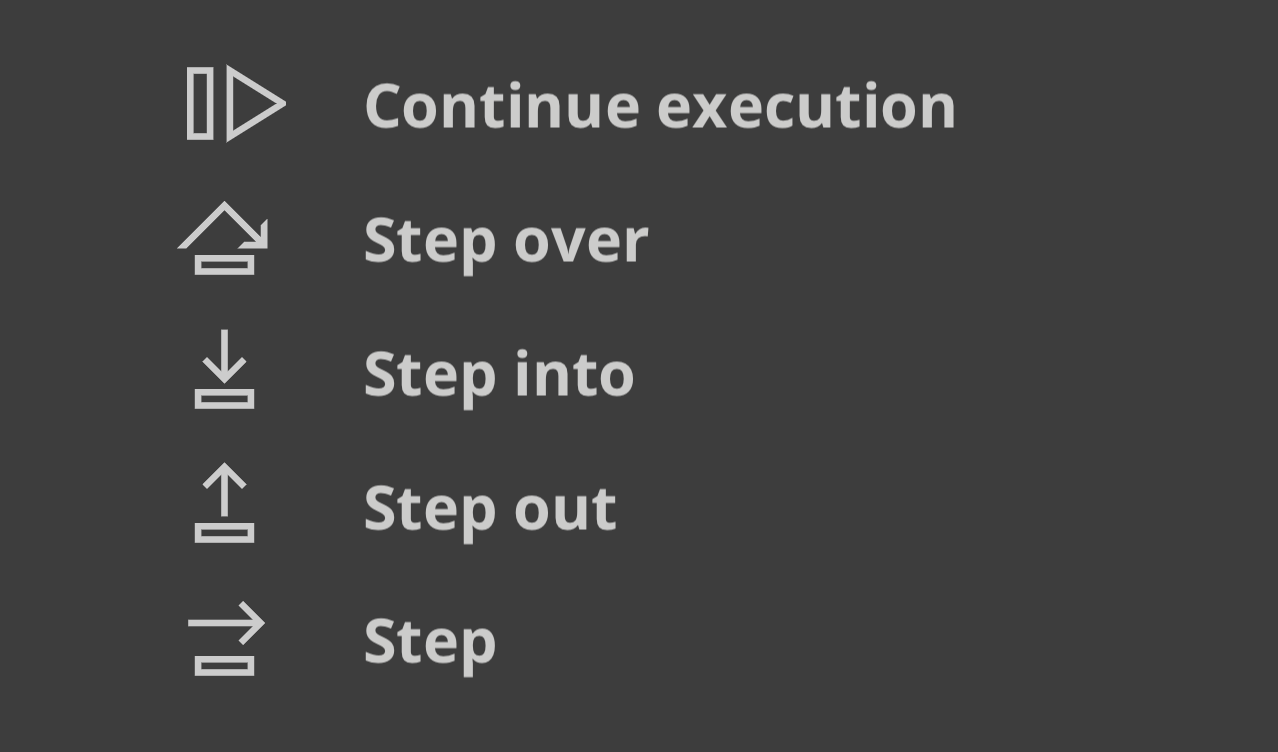
在 Sources 窗格左上角,我们可以控制程序的执行流程。

下面是对这些执行控制按钮功能的说明:
* *继续执行脚本* — 程序继续运行直到遇到下一个断点或异常。
* *单步跳过* — 程序继续执行到下一行。
* *单步进入* — 如果当前语句包含函数调用,则调试器会“进入”被调用函数内部。
* *单步跳出* — 如果当前语句是函数调用,调试器会完成该函数执行,然后“跳出”函数回到调用处。
### Visual Studio Code 调试器
Visual Studio Code 提供了对 Bun 脚本调试的实验性支持。使用前需要安装 [Bun VSCode 扩展](/guides/runtime/vscode-debugger)。
***
## 调试网络请求
`BUN_CONFIG_VERBOSE_FETCH` 环境变量允许你自动打印通过 `fetch()` 或 `node:http` 发起的网络请求。
| 值 | 描述 |
| ------- | ----------------- |
| `curl` | 以 `curl` 命令格式打印请求 |
| `true` | 打印请求和响应信息 |
| `false` | 不打印任何内容,默认值 |
### 以 curl 命令打印 fetch 和 node:http 请求
Bun 也支持将 `fetch()` 和 `node:http` 网络请求打印为 `curl` 命令,只需把 `BUN_CONFIG_VERBOSE_FETCH` 环境变量设置为 `curl`。这会将 fetch 请求打印为一行 `curl` 命令,方便你复制粘贴到终端中复现请求。
```ts index.ts icon="https://mintcdn.com/bun-zhcndoc/cnUTwgMuf4cCrwC-/icons/typescript.svg?fit=max&auto=format&n=cnUTwgMuf4cCrwC-&q=85&s=e7767043c9e885c34f2d6c8fe2a95217" theme={"theme":{"light":"github-light","dark":"dracula"}}
process.env.BUN_CONFIG_VERBOSE_FETCH = "curl";
await fetch("https://example.com", {
method: "POST",
headers: {
"Content-Type": "application/json",
},
body: JSON.stringify({ foo: "bar" }),
});
```
```txt theme={"theme":{"light":"github-light","dark":"dracula"}}
[fetch] $ curl --http1.1 "https://example.com/" -X POST -H "content-type: application/json" -H "Connection: keep-alive" -H "User-Agent: Bun/1.3.3" -H "Accept: */*" -H "Host: example.com" -H "Accept-Encoding: gzip, deflate, br" --compressed -H "Content-Length: 13" --data-raw "{\"foo\":\"bar\"}"
[fetch] > HTTP/1.1 POST https://example.com/
[fetch] > content-type: application/json
[fetch] > Connection: keep-alive
[fetch] > User-Agent: Bun/1.3.3
[fetch] > Accept: */*
[fetch] > Host: example.com
[fetch] > Accept-Encoding: gzip, deflate, br
[fetch] > Content-Length: 13
[fetch] < 200 OK
[fetch] < Accept-Ranges: bytes
[fetch] < Cache-Control: max-age=604800
[fetch] < Content-Type: text/html; charset=UTF-8
[fetch] < Date: Tue, 18 Jun 2024 05:12:07 GMT
[fetch] < Etag: "3147526947"
[fetch] < Expires: Tue, 25 Jun 2024 05:12:07 GMT
[fetch] < Last-Modified: Thu, 17 Oct 2019 07:18:26 GMT
[fetch] < Server: EOS (vny/044F)
[fetch] < Content-Length: 1256
```
以 `[fetch] >` 标记的行是本地代码发出的请求,以 `[fetch] <` 标记的行是远程服务器的响应。
`BUN_CONFIG_VERBOSE_FETCH` 环境变量同时支持 `fetch()` 和 `node:http` 请求,因此两种情况下都可以使用。
如果只想打印请求和响应信息,但不打印 `curl` 命令,可以将该环境变量设置为 `true`。
```ts index.ts icon="https://mintcdn.com/bun-zhcndoc/cnUTwgMuf4cCrwC-/icons/typescript.svg?fit=max&auto=format&n=cnUTwgMuf4cCrwC-&q=85&s=e7767043c9e885c34f2d6c8fe2a95217" theme={"theme":{"light":"github-light","dark":"dracula"}}
process.env.BUN_CONFIG_VERBOSE_FETCH = "true";
await fetch("https://example.com", {
method: "POST",
headers: {
"Content-Type": "application/json",
},
body: JSON.stringify({ foo: "bar" }),
});
```
```txt theme={"theme":{"light":"github-light","dark":"dracula"}}
[fetch] > HTTP/1.1 POST https://example.com/
[fetch] > content-type: application/json
[fetch] > Connection: keep-alive
[fetch] > User-Agent: Bun/1.3.3
[fetch] > Accept: */*
[fetch] > Host: example.com
[fetch] > Accept-Encoding: gzip, deflate, br
[fetch] > Content-Length: 13
[fetch] < 200 OK
[fetch] < Accept-Ranges: bytes
[fetch] < Cache-Control: max-age=604800
[fetch] < Content-Type: text/html; charset=UTF-8
[fetch] < Date: Tue, 18 Jun 2024 05:12:07 GMT
[fetch] < Etag: "3147526947"
[fetch] < Expires: Tue, 25 Jun 2024 05:12:07 GMT
[fetch] < Last-Modified: Thu, 17 Oct 2019 07:18:26 GMT
[fetch] < Server: EOS (vny/044F)
[fetch] < Content-Length: 1256
```
***
## 堆栈跟踪和 sourcemaps
Bun 会对每个文件进行转译,这看起来似乎会导致控制台中显示的堆栈跟踪不准确,只指向转译后的文件。为了解决这个问题,Bun 会自动为转译的每个文件生成并提供 sourcemap。当你在控制台看到堆栈跟踪时,点击文件路径即可跳转到原始源代码,即使它是用 TypeScript 或 JSX 编写的,或经过了其他转换。
Bun 会在运行时按需转译文件时自动加载 sourcemaps,也会在使用 `bun build` 预编译文件时加载。
### 带语法高亮的源代码预览
为了帮助调试,当发生未捕获的异常或拒绝时,Bun 会自动打印一段小的源代码预览。你可以通过调用 `Bun.inspect(error)` 来模拟此行为:
```ts theme={"theme":{"light":"github-light","dark":"dracula"}}
// 创建一个错误
const err = new Error("Something went wrong");
console.log(Bun.inspect(err, { colors: true }));
```
这会打印出错误发生处的带语法高亮的源代码预览,以及错误信息和堆栈跟踪。
```ts icon="file-code" theme={"theme":{"light":"github-light","dark":"dracula"}}
1 | // 创建一个错误
2 | const err = new Error("Something went wrong");
^
error: Something went wrong
at file.js:2:13
```
### V8 堆栈跟踪
Bun 使用 JavaScriptCore 作为其引擎,但许多 Node.js 生态和 npm 期望使用 V8。不同的 JavaScript 引擎对 `error.stack` 的格式不同。Bun 旨在作为 Node.js 的无缝替代品,因此我们负责确保即使引擎不同,堆栈跟踪的格式尽可能相似。
这就是为什么在 Bun 中打印 `error.stack`,格式与 Node.js 的 V8 引擎一致。这在使用期望 V8 堆栈跟踪的库时尤其有用。
#### V8 堆栈跟踪 API
Bun 实现了 [V8 堆栈跟踪 API](https://v8.dev/docs/stack-trace-api),它是一组允许你操作堆栈跟踪的函数。
##### `Error.prepareStackTrace`
`Error.prepareStackTrace` 是一个全局函数,可以定制堆栈跟踪的输出。该函数接收错误对象和一个 `CallSite` 对象数组,并返回自定义的堆栈跟踪内容。
```ts theme={"theme":{"light":"github-light","dark":"dracula"}}
Error.prepareStackTrace = (err, stack) => {
return stack.map(callSite => {
return callSite.getFileName();
});
};
const err = new Error("Something went wrong");
console.log(err.stack);
// [ "error.js" ]
```
`CallSite` 对象的可用方法如下:
| 方法 | 返回值 |
| -------------------------- | ------------------------- |
| `getThis` | 函数调用中的 `this` 值 |
| `getTypeName` | `this` 的类型名 |
| `getFunction` | 函数对象 |
| `getFunctionName` | 函数名称,字符串 |
| `getMethodName` | 方法名称,字符串 |
| `getFileName` | 文件名或 URL |
| `getLineNumber` | 行号 |
| `getColumnNumber` | 列号 |
| `getEvalOrigin` | `undefined` |
| `getScriptNameOrSourceURL` | 源码 URL |
| `isToplevel` | 如果函数在全局作用域中,返回 `true` |
| `isEval` | 如果函数是 `eval` 调用,返回 `true` |
| `isNative` | 如果函数是原生的,返回 `true` |
| `isConstructor` | 如果函数是构造函数,返回 `true` |
| `isAsync` | 如果函数是 `async`,返回 `true` |
| `isPromiseAll` | 尚未实现 |
| `getPromiseIndex` | 尚未实现 |
| `toString` | 返回调用位置的字符串描述 |
有时 `Function` 对象可能已被垃圾回收,因此部分方法可能返回 `undefined`。
##### `Error.captureStackTrace(error, startFn)`
`Error.captureStackTrace` 函数允许你在代码的特定位置捕获堆栈跟踪,而非错误抛出的地方。
这在有回调或异步代码时非常有用,因为它们使得确定错误源头变得困难。`Error.captureStackTrace` 的第二个参数是你希望堆栈跟踪起始的函数。
例如,下面代码会使 `err.stack` 指向调用 `fn()` 的代码,而不是错误实际上被抛出的 `myInner`。
```ts index.ts icon="https://mintcdn.com/bun-zhcndoc/cnUTwgMuf4cCrwC-/icons/typescript.svg?fit=max&auto=format&n=cnUTwgMuf4cCrwC-&q=85&s=e7767043c9e885c34f2d6c8fe2a95217" theme={"theme":{"light":"github-light","dark":"dracula"}}
const fn = () => {
function myInner() {
throw err;
}
try {
myInner();
} catch (err) {
console.log(err.stack);
console.log("");
console.log("-- captureStackTrace --");
console.log("");
Error.captureStackTrace(err, fn);
console.log(err.stack);
}
};
fn();
```
```txt theme={"theme":{"light":"github-light","dark":"dracula"}}
Error: here!
at myInner (file.js:4:15)
at fn (file.js:8:5)
at module code (file.js:17:1)
at moduleEvaluation (native)
at moduleEvaluation (native)
at (native)
-- captureStackTrace --
Error: here!
at module code (file.js:17:1)
at moduleEvaluation (native)
at moduleEvaluation (native)
at (native)
```